Friday, February 28, 2020

Multi Flash Photography

Multi Flash Photography

This is a technique in photography where you used a flashing light and a longer shutter speed and have a model standing in front of the camera so you can have multiple shots of them in one photo. This has to be done in front of a black screen so you cannot see anything in the background and so the main focus in on the model. For example, if you had you shutter speed on for longer than a second and have three flashes, you'll end up with three shots of the model.

This image has an empty alt attribute; its file name is image.jpeg

This image has an empty alt attribute; its file name is image-1.jpeg

Image result for multiple flash photography

Image result for multiple flash photography

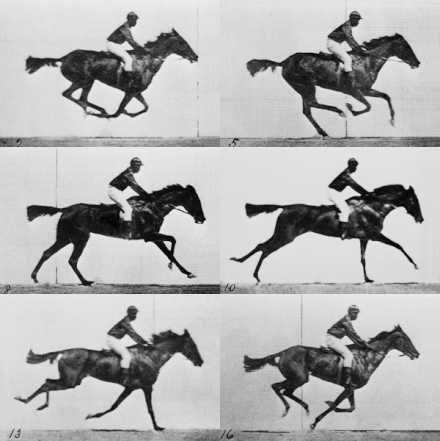
Eadweard Muybridge

This image has an empty alt attribute; its file name is image-2.jpeg

This image has an empty alt attribute; its file name is 220px-Muybridge_race_horse_animated.gif

Eadweard Muybridge was one of the first people to do photography like this. By looking at his photo, this allows me to understand how people could of done photography using the resources available to them and how far technology has developed to be able to manipulate photos even further to create the multi flash technique.

Contact Sheet

This image has an empty alt attribute; its file name is 2-1.jpg

Best Images

This image has an empty alt attribute; its file name is dsc_9585.jpg

I like this photo because I have managed to capture the model smiling and dancing which creates an overall happy atmosphere. Also, I have managed to fill most of the frame which helps demonstrate that I understand this technique and I can use it in the future.

This image has an empty alt attribute; its file name is dsc_9582.jpg

I like this photo because I have created and interesting affect of the models going up and down which makes it seem as if she has multiple arms at once, this almost reminds me of those types of dances where they would stand directly behind each other and move their arms in time with each other.

Overall, I really liked this technique because I found it fun and interesting to do and I ended up with cool results, and I could use this technique in the future if I was doing portraiture.

Worst Images

This image has an empty alt attribute; its file name is dsc_9576.jpg

I don’t like this image because it looks very chaotic and busy because the model is standing roughly in one spot. To avoid this in the future I would ask the model to move around the area a bit more to make it look less condense in one area.

This image has an empty alt attribute; its file name is dsc_9584.jpg

I don’t like this photo because the model is mainly in one corner because she wasn’t on the other side when the flash went off. Therefore, this makes the photo seem less effective because the model is not spaced out enough.

For this shoot, we set our cameras to shutter speed 4, ISO 200 and f stop 16. This allowed us to have the correct exposure for when the flash went off. We used a soft box for the flash and someone would keep clicking the button manually throughout the shot.

Slow-Sync

Slow-Sync

Slow sync flash is when you set off your flash either at the beginning or end of an exposure that is slower than normal.

Image Bank

Image result for slow sync flash photography

Image result for slow sync flash photography

I like these photos because they clearly demonstrate slow-sync with the interesting gold/ orange affect. I especially like the one with the coca-cola because of the way the font has created a weird affect in the gold light making the photo look more abstract.

Contact Sheet

This image has an empty alt attribute; its file name is 3-1.jpg

Best Images

This image has an empty alt attribute; its file name is dsc_9619-2.jpg

I like this photo because you are able to see a lot of flash from where the model moved her hand up and through the frame. This helps show that I’ve understood the technique and I can use this at a later date. However, to make it better next time I might get the model to move their hand slower so I can see more detail in the gold/orange light.

This image has an empty alt attribute; its file name is dsc_9618-2.jpg

I like this photo because you are able to see a bit of the models face in the flash creating and interesting affect as if there was two of them. Therefore, this creates more texture in the photo instead of just having a plain light show like the photo above. Also, I like this affect because it makes it seem like there's a ghost or another form of herself in the photo standing next to her creating a creepy affect.

Overall, I liked this shoot because it was something completely different to what I normally do, therefore, it could be a technique that I use in the future if I use portraiture.

Worst Images

This image has an empty alt attribute; its file name is dsc_9620-2.jpg

I don’t like this photo because there was not much captured during the flash because the model was walking too quickly. That made this photo less interesting because there isn’t a yellow streak going through the picture.

I didn’t like this technique because it wasn’t always successful and became frustrating to get the right affect. Also, if I was going to use this in the future I would have to practice and do more research on how to do it more successfully.

For this shoot, we set out cameras to shutter speed 2, ISO 200 and f stop 8, however the light meter did tell us that the settings was 5.6 but we found the affect was more clear at 8. Also, we used a snoot with modelling light made of tungsten to help create the yellowish/orange light.

Manipulating My Photos


For this edit, I didn't do too much editing because I didn't want to ruin the slow-sync affect. For this photo, I quickly brightened up the photo and added a bit of contrast to add more depth. I used the dodge tool to brighten up the light affect in the photo to help it stand out even more so it has more of an impact over the viewer.

An Illustrated Project Proposal

My Illustrated Project

This year I want to be looking at nature and its different forms. However, to make my pictures seem more interesting, I could add an additional deeper concept so my photos will have more depth. Also, take another view on nature, and not just take pictures of flowers, and take pictures of animals, woods and beaches instead.


Colour - I could focus my whole project and my preparatory shoots and show the difference in colour in different parts of nature. I could show the vibrance of colour in flowers and plants and contrast that to the neutral tones of forest. Also, I could try and capture sunrises/ sunsets and represent colour in that way.

Photographers that take a similar approach to theme of colour is Eliot Porter David Muench. Eliot Porter takes a lot of photos of forest and woodland scenery and shows the vibrant colours of the green and brown and makes the photos seem elegant. David Muench's photos are filled with varies vibrant colours which has a peaceful and calming tone to it. I could do something similar when taking photos of sunsets by manipulating my camera settings and capture all of the vibrant colours and exaggerate them slightly further in Photoshop.

While researching photographers and their styles I found other images which helped inspire me:

This image has an empty alt attribute; its file name is download-3-1.jpg

I like this photo because it helps inspire me on how to capture interesting and alluring photos. Also, I like how the colours in this photo does not seem dull and still looks vibrant, even though they are neutral tones. I could achieve something similar by taking pictures of forests that have a lot of light going into it.

This image has an empty alt attribute; its file name is download-2-2.jpg

I like this photo because they have managed to capture a bee on the flower, this helps me think about my timing and opportunity, and not just take pictures of flowers. This helps me think about how I could wait for the right moment to capture an insect of the flower to create more interest.

Techniques I could use is manipulating and playing around with curves to help emphasise the colours in the pictures without the final outcome become too saturated.


Tone - I could focus on the tone of the photo and convert all of my images into black and while while editing. This will help show the detail in my photos a lot more easier by the shadows and highlights more exaggerated. Also, my photos will be more closely linked together by all following the theme of black and white.

Photographers that take a similar approach is Ansel Adams and Imogen Cunningham. They convert most of their images into black and white and show off a lot of tone in their work. I could do something similar by editing certain areas in photoshop to help exaggerate the shadows and highlight to create that strong contrast.

While researching photographers and their styles I found other images which helped inspire me:

This image has an empty alt attribute; its file name is download-4.jpg

I like this photo because there is a lot of strong tone from the high contrast from the shadows and highlights. This helps me think about what position I stand in when taking photos because if I capture a photo with the sun in the image I will be able to get the shadow from behind the tree achieving a similar affect to this.

This image has an empty alt attribute; its file name is download-5.jpg

I like how the tone in this image is simple and subtle making the overall photo seem elegant. If I took pictures like this as well this would give me more variety of photos by having images filled with tone and some with only subtle amounts.

Techniques I could use is converting all of my pictures to black and white and use burning and dodging to help exaggerate the highlights and the shadows in the photo.


Time - I could focus on different times of the day in nature. I could take pictures of the sky in different times in the day and tell a story through them. Also, I could take photos in the exact same place and edit it in photoshop to create a smooth transition through the image to make it look as if time was moving in the photo.

A photographer that has done something similar to this is Brian Eno because he took a video of the sky and the clouds travelling by, representing time and how it is moving on. I want to create this same affect but in my own style of only having a still picture and editing the different sceneries in to create a gradual smooth transition.

While researching photographers and their styles I found other images which helped inspire me:

This image has an empty alt attribute; its file name is download-8.jpg

I like this photo because it shows a time difference on the moon and its full cycle. I like this concept of time travelling/ moving on in a still picture because you are able to see all of the little tiny details in the rest of the picture because it is not moving.

This image has an empty alt attribute; its file name is download-9.jpg

I like how this one clearly shows the sky changing from light to dark and how you go further through in a picture the buildings start to turn their lights on. This photo really drags the eye through the whole image to see all of the little tiny details. I would like to do something similar but I would like to be able to get a smooth transition instead of a grid one to make the affect seem more realistic.

Techniques I would use is layering multiple pictures on top of each other and colour in the sections that I want.


Circles - During my independent shoots, I could experiment with circles but either creating them or finding them naturally. To create them, I could edit a circular shapes into the picture to add more texture and interest to my photo to make it stand out slightly or bring a circular clear ball and take pictures using it. Or, I could take pictures of already circular objects such as the moon. Also I could manipulate things around me, I could place my camera down on the ground around long grass and point it up so the grass will create a circular shape round the edge of the frame.

A photographer that does something similar is Viven Maeir, she takes photos of day to day life which have a circular theme to them which I could use in my own photography. However, instead of taking pictures of day to day life I would use nature instead.

While researching photographers and their styles I found other images which helped inspire me:

This image has an empty alt attribute; its file name is b74c92dfa63f11c856db9504cca5ca57-shape-photography-tumblr-photography.jpg

I like this photo because the overall photo is simple but the circle affect given in photoshop later makes the photo more alluring and interesting because it is an affect which is not done often. I could use this technique to help expand my final images and experiment with different method.

This image has an empty alt attribute; its file name is images.jpg

I like this photo because of the illusion the glass ball gives, it makes the photo seem slightly more complex even though the technique is simple. Also, I like how the photographer realised how there was an ant near by and took the opportunity to take a picture of it pushing the ball.

Techniques I could use is selecting certain places in the picture and flipping them upside within a circle or converting parts of it to black and white to create a slight contrast of colour.


Reflection - I could use reflection to help make my photos look more interesting by having a contrast of texture. I could find a lake in a nature park and take pictures of the trees and its reflection to create a weird illusion. or, I could bring a mirror out with me and take pictures using that so I can get different angles, such as taking a picture of the ground but using a mirror to be able to capture the sky as well.

A photographer who does something similar to this is Vivian Maeir. She has used mirrors to take pictures and create interesting affects by being able to capture two different angles at once. I would like to achieve this same affect but by getting reflections of nature.

While researching photographers and their styles I found other images which helped inspire me:

This image has an empty alt attribute; its file name is download-7.jpg

I like how elegant this photo looks because of the clear the reflection is and it's not too blurred from ripples. Also, I like how the colours in the sky create a nice gradient and blend into each other effortlessly, creating a calming atmosphere.

This image has an empty alt attribute; its file name is download-10.jpg

I like how they have brought a mirror because you can take a picture of two different angles, like here, they're taking a picture of the ground but also capturing the sky and tree above. This would make my photo seem more interesting and make the viewer more curious about the multiple angles.

Techniques I could use is converting the reflection part into black and white so the reflection would have an even further contrast and stand out more. Or, I could use the curves and contrast settings to help make the overall photo stand out and become more interesting.


After researching all of these topic ideas I could use with nature and thinking on how I could develop it and experiment with different methods, I have decided to use reflection. With using reflection, I could use it in multiple ways to demonstrate that I can think more broader and expand my photography further. I can do things such as using water, mirrors and manipulation in photoshop, by using these I can create a wide range of portfolio images to help present that I am able to take my project and experiment with it in multiple different ways.